
New Administrators
Thank you for choosing BART – welcome aboard!
This tutorial is intended to help you and your team get up and running with BART as quickly as possible. At the end of this lesson, you will have a solid understanding of BART and have the expertise necessary to setup and administer the system for your team.
Below are a number of quicklinks to let you jump to specific topics, although if you’re new to BART we recommend you start from the beginning.
You can also download this document, which includes additional information for BART Administrators: Additional Information for BART Administrators (pdf 1.6MB)
Extra Resources
Please click here for additional documents and training materials
Overview
1. Understanding the BART Modules

BART focuses on simplicity and comprehensiveness, and consists of 5 modules:
BART Team app
(for smartphones and tablet devices)
The BART Team app is the module that most of your members will use, most of the time. After a member has logged in, we suggest they remain logged in to stay connected.
You and your team can download the BART Team app on your own personal smartphone or tablet device:
![]()
![]()
(Once downloaded, you’ll need to have your login information handy!)

Members area
(web-based application)
Anyone can log into the Members area, however only you as an administrator will have access to certain areas. You will also have higher privileges than your other members, which means you will have the ability to add, edit and delete a range of settings. Here you can create members and update their details.
After you’ve clicked the link, you will need to have your login information handy.

Dashboard
(web-based application)
The Dashboard has been designed to provide real-time situational awareness at your headquarters, station, unit or shed. It’s commonly setup with a large screen, providing members with a way to see what’s going on – without having to look at the BART Team app on their individual devices.
We offer a free MicroSD card for those who want to use a Raspberry Pi to run the Dashboard. It’s only available to those who have a dedicated Dashboard license registered, as we pre-configure the SD card with your Dashboard membership details – so it’s ready to go.
For more information on using a Raspberry Pi to run the Dashboard at your headquarters, click here
To request a pre-loaded SD card for your Raspberry Pi at headquarters, please click here

Turnout
(web-based application)
The Turnout application has been designed to assist with area or regional controllers. It provides a snapshot of all incidents within a specific region, to ensure that all incidents have been responded to in real-time.
After you’ve clicked the link, you will need to have your login information handy
RAMP
(currently only available for iOS smartphones & tablet devices at this time)
RAMP stands for: Resource Allocation Management Platform
RAMP was designed to help manage resources across multiple agencies. It offers a simple and visual way to keep track of people and appliances – on and off the field. It is linked to the BART Team App and Dashboard on an incident basis, and allows for ‘pre-shift’ planning and preparation.
RAMP can be used to draw objects and insert icons on the Incident so that members viewing that incident can see the spatial information.
Currently RAMP is still in BETA mode; please contact us if you would like to trial the module.
Setup
2. Setting up BART for your Group
Headquarters, Station, Unit or Shed
The first thing you will need to do after being approved as a new administrator, is ensure that your headquarters is set in the correct location. This is vital, as an inaccurate headquarters location will affect the estimated time of arrival for your members.
How do I set the location of my headquarters?
To set your headquarters location:
- Log into the BART Members area
- Navigate to the ‘Administration’ item in the main menu

- Select ‘Groups’ from the sub-menu
- You should see a list of one or more groups that you administer on the screen
- Select the group that you wish to set the headquarters location for
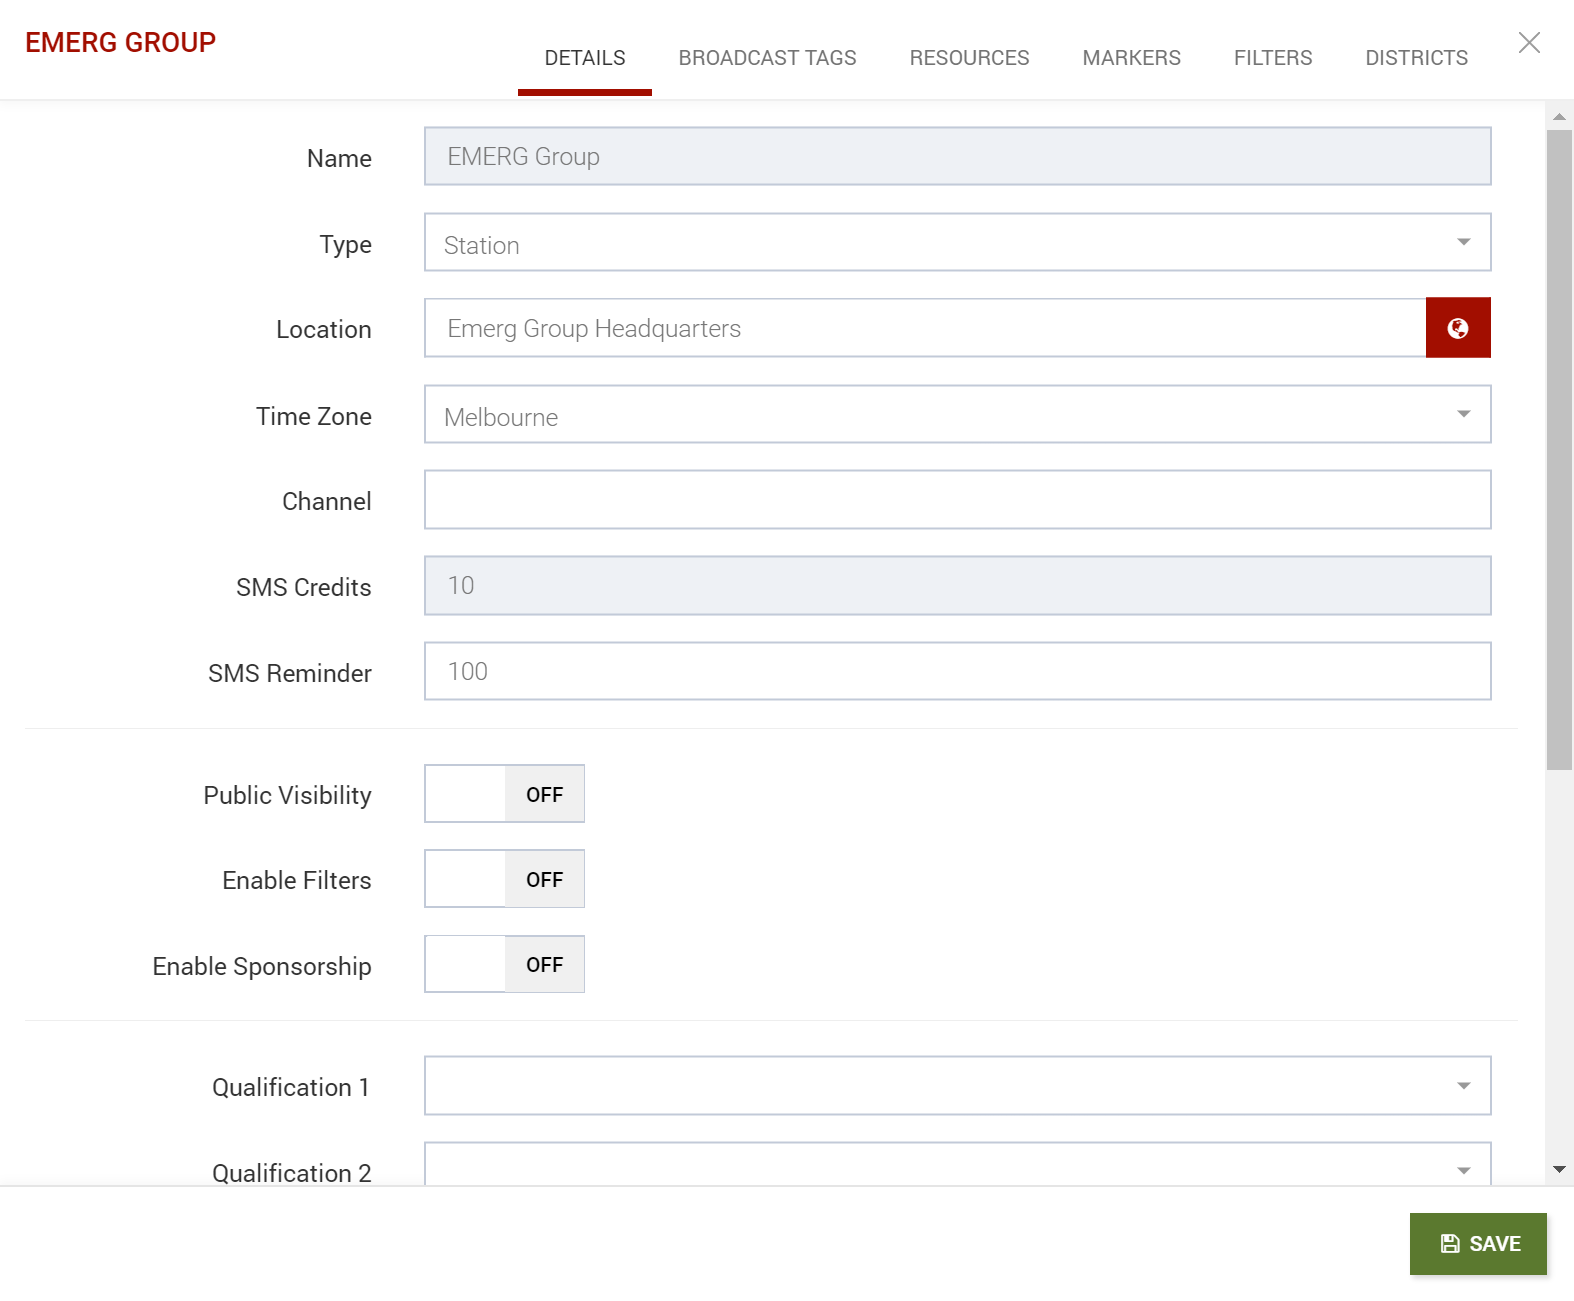
- A popup dialogue box will appear, with the ‘Details’ tab open by default

- If there is already an existing address in the ‘Location’ field, check to make sure it’s accurate. If it’s not, you can update it by:
- Clicking inside the text field and typing your address in, OR
- Clicking on the globe icon button at the end of the field. This option provides you with a map, where you can either enter your address or enter in the latitude and longitude digits into the fields provided. You can also click and hold the map pin, and drag it around the map to the correct location.

Broadcast Tags
Broadcast tags are generally created and allocated for your group during the signup approval process. If you need additional tags however, please follow the instructions below.
There are three steps to creating and allocating a broadcast tag:
- Create a new broadcast tag
- Choose the members who will receive notifications from your new broadcast tag
- Choose the members who can send notifications from your new broadcast tag
- Create a new broadcast tag:
- Navigate to the ‘Administration’ item in the main menu
- Select ‘Groups’ from the sub-menu
- A popup dialogue box will appear – navigate to the ‘Broadcast Tags’ tab
- You can either select ‘ADD’ to add an existing broadcast tag to your group, or select ‘NEW’ to create a new broadcast tag
- Enter the ‘Tag’ code – Short code 8 characters or less (this code MUST be unique. If the code is already in use within BART, the new broadcast tag will not be created)
- Name the broadcast tag
- Send code
- Phone number
- Environment
- Messaging – turn on
- The following options should only be modified by more advanced members:
- Any Sender
- Heartbeat
- X Origin
- Y Origin
- Zone
- X Origin 2
- Y Origin 2
- Zone 2
- Navigate to the ‘Administration’ item in the main menu
- Now you need to choose which members receive messages on your new broadcast tag:
- Navigate to the ‘Administration’ item in the main menu, and navigate to ‘Members’
- Select a member that you would like to allocate the broadcast tag to
- A popup dialogue box will appear
- Navigate to the ‘Broadcast Tags’ tab at the top of the popup box – you will see a list of all the broadcast tags available for your group
- Use the ‘ON’ / ‘OFF’ toggles to choose the broadcast tags your member can view
- You can now select whether your member will receive the broadcast via:
- SMS (the broadcast tag must have a phone number associated)
- Push notification
- For each of the options above, you can select when your member will receive the broadcast:
- None
- Non-alerts only
- Alerts only
- All
- Next you will need to choose which of your members can send messages on the broadcast tag:
- Navigate to the ‘Administration’ item in the main menu
- Select ‘Groups’ from the sub-menu
- Choose your group, and a popup dialogue box will appear
- Navigate to the ‘Broadcast Tags’ tab at the top of the dialogue box
- Choose your broadcast tag, and another dialogue box will appear
- Select the ‘Senders’ tab from the top of the dialogue box
- You will see a list of members that can currently send broadcasts from the tag
- To add another member to the list, click on the blue ‘ADD +’ button at the top of the dialogue box
- You will see a list of your members – select a member from the list
- Click ‘SAVE’
Resources
Although not vital, you may want to create and store a list of resources that your group has access to. These resources can be selected for allocation when creating calendar ‘Events’.
- Navigate to the ‘Resources’ tab
- Click on the blue ‘NEW +’ button

- You’ll be prompted to enter in a ‘Name’ and a ‘Description’
- Click ‘CREATE’

- Repeat steps 2 through 4 for each additional resource required


Markers
Like ‘Resources’, you may wish to add your markers in at a later stage. Markers can be any locations of interest on a map, including:
- Fire hydrants
- Water points
- Boat ramps
- Air fields
- Control Points
- Defibrillators
- Helipads
- Staging points
If you require a bulk upload of markers, please email us with an Excel spreadsheet. The spreadsheet must include 3 columns, as displayed in the example below:
| Reference | Latitude | Longitude |
| 42 Adelaide St | -37.7403 | 144.789813 |
3. License Types
There are 5 types of memberships to choose from:
Person
This is the most common type of membership, where each ‘Person’ license can be distributed to a member of your group.

Appliance
This type of license is for your appliances, which can be trucks, tankers, cars or machinery. When logging into an appliance account type, you will see that the BART Team app is slightly different. It includes a range of status buttons specifically designed to record and share information vital to the turnout process:
- Acknowledge (this status activates the tracking of the appliance – appliances will be visible to other groups within a 100km radius)
- On the way
- Arrived
- Returning
- Back at headquarters
Many groups place a smartphone or tablet device in the appliance, however members can easily switch between an appliance account and their own personal account by using the ‘Profile Switch’ option in the BART Team app.
All key times and locations are recorded and included in the incident report.
Observer
This type of license is the same as the ‘Person’ type, however observers aren’t able to interact with the group by sharing their status or participating in discussions.
Dashboard
This type of license is used specifically for the Dashboard module. It allows you to setup your Dashboard at headquarters, without having to worry about regularly signing in and out of different accounts.
If you choose to use a Raspberry Pi in your Dashboard setup, we will send you a free MicroSD card pre-loaded with your Dashboard credentials.
API
This type of license is offered for connection with other systems, ie. CAD systems.
4. Adding New Members
There are 3 ways of adding new members to your group. You can use any combination of these, depending on your individual situation:
BART Website
Members of your team can register themselves through the BART website: BART Membership Registration
When registering, they must select your correct group name from the dropdown list provided. Once they have successfully submitted the registration form, you will receive an email requesting for them to join your group.
To accept their request:
- Log into the BART Members area and select ‘Administration’ from the main menu.
- Select ‘Members’ from the sub-menu provided
- Select the ‘Requests’ tab in the right-hand corner of the screen
- You will see two lists; the top table will show you all requests coming from members of your team. The bottom table will show you all requests coming from members of other teams.
- Select the members you want to add to your group
Manual Input
Manually add new members via the Members area:
- Log into the BART Members area and select ‘Administration’ from the main menu.
- Select ‘Members’ from the sub-menu provided
- You can choose to add a member that already exists in the system by selecting the ‘ADD +’ option, or alternatively you can create a new member from scratch by selecting the ‘NEW’ option.
- When adding a new member from scratch, you will need to include:
- First name
- Surname
- User name
- Mobile
- Password*
- Type (ie. Person, appliance etc.)
- Level (ie. Regular member or additional Administrator)
* Hint: For security purposes, we have a number of minimum requirements for new passwords:
- It must contain at least 6 characters
- It must contain at least 1 capital letter
- It must contain at least 1 lowercase letter
- It must contain at least 1 numeral
Import
Import Members
If you would like to add multiple members at the same time, you can use the ‘Member Import’ facility through the BART Members area. This option is perfect for bulk imports, as it is much faster than entering in each member manually.
- Log into the BART Members area and select ‘Administration’ from the main menu.
- Select ‘Members’ from the sub-menu provided
- Select the ‘Import’ tab in the right-hand corner of the screen
- Download the CSV template provided

- Open up the CSV in Excel or other spreadsheet program, and replace the example information in the cells with your new member information
- Save your CSV (try not to overwrite the template file in case you need to refer back to it again)
- Select the ‘Choose File’ button within the Member Import area and find your saved CSV
- You will need to check the import logs provided to ensure that your members have been imported successfully; if no errors display, check your member list to make sure your members have been created

5. Purchasing & Allocating Licenses
In order for your members to access and utilise the BART system, they must have a current valid license. Licenses can be purchased by the individuals themselves, or by you the administrator for the entire group.
Purchasing Licenses
Licenses must be purchased through the BART Members area, or by visiting the ‘BART Purchases’ page on the BART website.
Purchasing through the Members Area
Individual Members
- Log into the BART Members area and select ‘Subscription’ from the main menu.
- Find the table titled ‘User Level Subscription’
- Click on the ‘RENEW’ button on the right-hand side of the table in the ‘Subscription’ column

- You will be asked to read and agree with the Terms and Conditions; tick the checkbox provided before proceeding on to the next step

- Once you have ticked the checkbox, the ‘NEXT’ button will be enabled. Click it to go onto the next step
- Next you will see a summary of your purchase, and you’ll be asked to choose your preferred payment method.
- Choose from:
- PayPal/ Credit Card
- Cheque
- Bank Deposit
- Quote Only
- Depending on your choice, you will be prompted to add in your details. Follow the prompts to complete your order


Group Memberships
Groups may have different purchasing requirements than individuals, so we have provided some additional options for you to purchase online or simply generate a quote.
To purchase a group subscription or generate a quote, follow these steps:
- Log into the BART Members area and select ‘Subscription’ from the main menu.
- Find the table titled ‘Group Level Subscription’
- Click on the ‘RENEW’ button on the right-hand side of the table in the ‘Subscription’ column
- You will be asked to read and agree with the Terms and Conditions; tick the checkbox provided before proceeding on to the next step
- Once you have ticked the checkbox, the ‘NEXT’ button will be enabled. Click it to go onto the next step
- Next you will see a summary of your current details, and be asked to enter in the number of licenses you require
- You will notice that when entering a number into the ‘Licenses’ text box, the ‘Price’ and ‘Pro-rata Deductions’ will be updated automatically
- Next you will see a summary of your purchase, and you’ll be asked to choose your preferred payment method.
- Choose from:
- PayPal/ Credit Card (an invoice can be instantly downloaded)
- Cheque (an invoice can be instantly downloaded)
- Bank Deposit (an invoice can be instantly downloaded)
- Quote Only (a quote can be instantly downloaded)
- Depending on your choice, you will be prompted to add in your details. Follow the prompts to complete your order
Pro-rata Deductions
The BART Team frequently get asked the question:
What happens if you want to purchase a pack of group licenses, but one or more members already have individual licenses?
When a group decides to sign up with BART, it’s common for there to already be a number of individuals with existing licenses.
In cases like these, there’s a number of reasons for why a group administrator would want to purchase a subscription for the entire group:
- Group licenses are much cheaper per member than individual subscriptions
- Only one person needs to maintain the subscription renewals
- All members within the group are renewed on the same day
Whatever the reason, BART ensures that a credit is assigned for any months left on a subscription. This can be seen when purchasing a group license in the ‘Pro-rata Deductions’ area.
Allocating Licenses
Licenses can be allocated to anyone in your group:
- Log into the BART Members area and select ‘Members’ from the main menu
- At the top of the page, you will see:
- The number of licenses available (which haven’t been assigned)
- The number of licenses required (members who don’t have licenses)
- The total number of members in your group
- The Group License Renewal Date
Hint: If you need to add on extra licenses or renew the group, visit BART Purchases - Tick or untick the checkbox inside the ‘License’ column next to each of your members – this will add or remove licenses


6. Member Permissions
It’s up to the group administrator to ensure the right people have the right permissions. These can be updated at any stage to provide for changing conditions.
To access a member’s permissions:
- Navigate to ‘Administration’ in the main menu
- Select ‘Members’ from the sub-menu
- Select the member you wish to modify permissions for
- Choose the ‘Permissions’ tab at the top of the popup dialogue box.
General Permissions
Private Mobile
Although administrators can set this option, members can also change this for themselves. This setting should be enabled for those who do not want their mobile number to be available to other members of their group.
Send Broadcast
This setting determines whether a member can send out broadcast messages. If enabled, you will need to choose which broadcast tags the member can send out messages to.
To do this, you will need to navigate to ‘Administration’ > ‘Broadcast Tags’
Select the broadcast tag that you wish to allow your member to send messages to, and a popup dialogue box will appear. Select ‘ADD +’ in the top left-hand corner and choose your member from the list.
SMS Send Instructions
This setting is only relevant for those using non-smartphones and those who receive notifications via SMS. When enabled, each notification received via SMS will contain instructions for the member to refer to on how to respond to the notification.
Edit Broadcast
This setting will enable your member to edit broadcast notifications after they have been sent out. This option is useful for when the details and location of a notification needs to be adjusted.
Group-Specific Permissions
Default Group
This setting indicates the ‘home group’ for a member, if they belong to more than one group.
Observer Only
This setting indicates whether the member in your group only sees alert-type incidents. When enabled, they are not shown in the active member list and do not see discussions.
Create Events
This setting enables your member to create ‘Calendar Events’.
Close Incidents
This setting enables your member to ‘Close Incidents’. When an incident is closed, a report is automatically generated and emailed to everyone in your group who has the ‘Email Reports’ setting enabled.
Email Reports
This setting enables your member to receive a PDF report via email whenever an incident has been completed. The report is automatically generated when the incident has been officially ‘Closed’.
Low Balance Reminders
This setting enables members to receive reminders when the SMS credit limit is reached. It’s most useful for members who have non-smartphones, and those who utilise SMS notifications.
Account Manager
This setting enables members to receive renewal reminders when the group’s subscription is due. It also allows the member to pay on behalf of the group.
Basic Usage
7. BART Team App
Your team members will predominantly use the BART Team app. It is used to help provide key information about individual members of your team when turning out to an incident.
The goal of the BART Team app is to help you and your team turnout as quickly and efficiently as possible.
Installation
Members will need to download and install the BART Team app for their device:
![]()
![]()
Once installed on their device, they will need to login using their BART membership credentials.
Device Setup
In order for BART to function correctly, members will need to ensure it’s setup correctly for their device.
Notifications
Notifications are an important aspect of the BART Team app. Members are alerted when a new broadcast message is sent out, where it’s crucial for them to respond as quickly as possible.
Broadcast messages come in the form of Push Notifications on a smartphone or tablet device. Regardless of whether a member is using an Apple or Android device, it’s important that they check to make sure Push Notifications have been enabled specifically for the BART Team app.
Location Services
Enabling location services for the BART Team app is vital for certain functions to operate correctly. Some of these include:
- Members ETA (to headquarters)
- ‘Share my Location’ function
- Map
- Routing to headquarters and the incident
- Resource layers (location of hydrants, road closures, control centres etc.)
- Traffic conditions
Generally, when a member installs the BART Team app for the first time, they will be prompted to enable location services. It’s easiest for members to enable location services straight away, however they can still go into their phone settings to enable them at a later time.
8. Notification Response
The most basic task you want to set for your members is to respond to a notification with their status:
- Green ‘Thumbs Up’ – im attending
- Red ‘Thumbs Down’ – im not attending
- Orange ‘Other’ – this status is a group decision. It can mean:
- I’m going direct to the incident location
- I’m busy; if you need me call
- I acknowledge the notification
When a member chooses the green ‘Thumbs Up’ status, their ETA is automatically generated using their current location. This gives those at headquarters a good indication of how far away they are, and whether to wait or turnout without them.
We encourage new members to get comfortable with this basic functionality, before moving onto the more advanced features of the BART Team app.
Non-smartphone Members
You may have some members in your group who don’t have a smartphone. We recommend encouraging those members to use BART’s SMS notification service.
SMS notifications can be used by any member of your group. As BART utilises a high priority SMS service to ensure that an SMS is received at the same time as the push notification, members are required to purchase SMS credits. SMS credits can be purchased by individuals for personal use, or for groups.
Members using only SMS notifications are able to respond with both their status and ETA:
0 – Not attending
1 – Attending
2 – Other
Example:
| Response | . | ETA |
| 1 | . | 15 |
1.15
(Attending, with a 15-minute ETA)
Purchasing SMS Credits
SMS credits can be purchased for groups or individuals via the BART Members Area, or by visiting the ‘BART Purchases’ area of the BART website.
9. Sending Broadcasts
Sending a Broadcast
To help get your members comfortable with responding with their status, begin by sending out a test broadcast. This can be done in any of the 5 BART modules, however the two most common ways of sending out a broadcast are with the BART Team App and the Members Area:
BART Members Area
- Log into the BART Members Area
- In the top banner area, you will see a red ‘NEW’ button
- Press the button, and select ‘New Broadcast’

- A popup dialogue box will appear

- Select the group that you want to send the broadcast out to
- Select any specific members that you want to send the broadcast out to
- Enter a message into the text box provided
- Enter in a location (if required)
- Enter in an incident description (if required)
- Select or enter in the type of incident
- Add an attachment (if required)
- Add in a reference (if required)
- Choose whether your new broadcast is to be an alert or not
- Click ‘SEND’


BART Team App
- Open up the BART Team app on your device, and log in
- Tap on the red circle button with the plus in the bottom right hand corner of the screen

- You will be given 3 options:
- New Team
- New Discussion Message
- New Broadcast
- Choose the ‘New Broadcast’ option
- Like in the Members Area, you will need to select a team that the broadcast is to go out to
- Select a ‘Location’ (if required)
- Add an attachment (if required)
- Choose whether it’s an alert or not
- Enter in your message
- Tap ‘Send’
Please note: you will either need to forewarn your group that you’re sending out a test broadcast and require their responses, or explain it in the message you send out.
Ie. This is a trial broadcast. Please respond with a status for testing purposes.
10. Setting Availability
The availability roster within the BART Team App, Members Area and Dashboard is there to provide members with the ability to set and share their personal availability with their group. Knowing each members availability can assist with member selection when putting crews together for an incident response.
Availability can be set by members themselves, or by an administrator of their group.
BART Team App
Within the BART Team App, there are two different methods of setting your availability:
-

- Table
- Tap on the ‘Availability’ item in the quick menu at the bottom of the screen
- The ‘Table’ view will display by default
- Tap on each cell that you wish to set:
- Available – 1 tap
- Not available – 2 taps
- At premises – 3 taps
- Emergency only – 4 taps
- Delayed – 5 taps
- Clear – 6 taps
- Table


- Set
- Select a status from the options listed
- Choose your ‘From’ time
- Choose your ‘To’ time
- Select your date
- Tap on ‘Go’
Individual members can navigate to the ‘Members’ tab within the availability area to see the daily availability of the rest of their team.
An individual’s availability is most prominent within the Dashboard, where availability status is clearly displayed within the column provided.
BART Members Area
The Availability area within the Members Area provides you with a comprehensive overview of member availability within your group.
- Log into the BART Members area and select ‘Availability’ from the main menu
- If you belong to more than one group, select the group that you wish to view from the top dropdown menu
- Next choose the date you wish to look at (the current date will display by default)
- If you would like to view members with one or more specific qualifications, use the ‘Filter’ dropdown menu provided
- The first table you will see is the availability ‘TOTALS’:

- This will give you an overview of member availability for the day, broken up into hourly blocks
- Availability statuses are broken up into:
- Available
- Delayed
- Emergency Only
- Not Available
- Booked
- Top 3 qualifications
- The second table displays a list of each of the members in your chosen group

- The day is broken up into hourly blocks
- The qualifications of each member are listed below their name
- To add or change the availability of a specific member, click on the table cell for the hour you wish to set
- Available (1 click)
- Not available (2 clicks)
- At Premises (3 clicks)
- Emergency only (4 clicks)
- Delayed (5 clicks)
- Clear (6 clicks)
- The third table displays a list of each appliance in your chosen group
- To add or change the availability of a specific appliance, click on the table cell for the hour you wish to set


11. Maps
Changing the Incident Location
The location of an incident can be altered in BART if it has changed since the broadcast was sent out, or if the location is inaccurate.
This can be done in a number of ways through the BART Team App:
- Local Change
- Choose the broadcast that you want to modify the location for
- Tap on the map preview; you will be taken to the full screen map view
- Tap on the incident pin and hold it until the map moves slightly behind the pin
- Whilst still holding the pin down, drag it across the map to the correct location
- Once you let go of the pin, you will be asked to confirm whether you want to ‘Confirm Location Change’.
- If you’re happy with the updated location, tap on the ‘Confirm’ option
- Remote Change – Option A
- Choose the broadcast that you want to modify the location for
- Tap on the map preview; you will be taken to the full screen map view
- Tap once on the incident pin to display the information bubble, then tap on the bubble itself
- You will be prompted to enter in a new address for the incident location
- Begin entering in your new address, and you will see an automated list of locations to choose from
- Select one of the locations provided, and you will be prompted to ‘Confirm Location Change’
- Tap ‘Confirm’
- Remote Change – Option B
- Choose the broadcast that you want to modify the location for
- Tap on the ‘Options’ arrow in the top right-hand corner of the broadcast row
- You will see a list of options appear
- Tap on ‘Update Location’
- You will be prompted to enter in a new address for the incident location
- Begin entering in your new address, and you will see an automated list of locations to choose from
- Select one of the locations provided, and you will be prompted to ‘Confirm Location Change’
- Tap ‘Confirm’
Tracking
Tracking can be enabled for both individual members and appliances in a number of different ways.
Individuals
Individuals can choose to be tracked at any time through the BART Team App. This can be done automatically on acceptance of a broadcast if chosen within the settings:

Or set temporarily by activating the ‘Track Me’ option:

In addition, members can also share their current location.
Appliances
Although appliances use the same BART Team App, the information that’s gathered and shared is slightly different to the version that’s used by individual members.
When the ‘Acknowledge’ status is set, for example, tracking is automatically enabled. Unlike the individual member version, where it’s only other members of your group who can see your location, all members within a set radius are able to see the location of an appliance – regardless of group.
The location of appliances on the map are displayed with an icon, which change colour depending on the status set:
- Acknowledge (Red)
- En-route (Green)
- Arrived (Yellow)
- Departed (Blue)
- Back (Orange)
In addition, the times and locations of an appliance during a turnout are all recorded for inclusion within the incident report.
Mapping Information
There are a number of mapping options provided, which can help provide you with better awareness of your location and surroundings.
When opening up any available map for a broadcast, you are provided with your current location in a variety of formats:
- Latitude and longitude
- GRID reference
- UTM reference
Quick Options
There are a number of ‘quick options’ within the mapping interface for more frequently used actions:
- Water (fire hydrants and water points)
- All (all active incidents)
- Directions (activate routing)
Directions
The ‘Directions’ button provides you with routing information to key locations:
- Routing, ETA and distance (in km) to your headquarters
- Routing, ETA and distance (in km) to the incident location
- Routing, ETA and distance (in km) from your headquarters to the incident location
In addition, there is a ‘Direct to Location’ button, which will zoom and focus the map to look at the incident location.
Map Layers
There are a number of map layers available, which indicate key locations within the area. Locations can include:
- Fire hydrants
- Water points
- Airfields
- Defibrillators
- Road closures
- Boat ramps
Map Settings
You can access a range of map settings by tapping on the map settings gear icon in the bottom right hand corner of the screen.
- Traffic (shows current traffic conditions)
- Map display:
- Standard
- Hybrid
- Satellite
- Terrain
- Routing (On or off)
- Marker radius
- Tracking radius
- Tracking timeout
12. Building Crews
As an administrator, you have the ability to assign members to an appliance via the ‘Crew Builder’.
Building a crew makes it easy to:
- Record which members are travelling to an incident within a specific appliance
- Assign a driver and a crew leader to an appliance
- Keep track of where your appliance is at all times
- Record the times and locations of your appliance when:
- The appliance is activated
- The appliance is on its way to an incident
- The appliance has arrived at the incident
- The appliance is on its way back from an incident
- The appliance is back at headquarters
Building a crew can be done from within the BART Team App or the Dashboard:
Dashboard
- Choose the broadcast that you want to build a crew for
- Select the ‘Crew Builder’ tab from within the attendance panel
- Mark the members that you would like to assign via the tick box at the end of the row
(To make selection easier, you will see member statuses and availability) - With your members selected, click on the appliance that you would like to assign them to
- You will see that the members you have selected will now appear underneath the appliance you assigned them to

- To designate your ‘Driver’ and ‘Crew Leader’, click on one of the members assigned to the appliance, and select from the options provided


BART Team App
- Tap on the broadcast that you want to build a crew for
- Tap on the options button in the top right-hand corner of the screen
- A list of options will appear – select ‘Activate Crew Builder’
- Mark the members that you would like to assign by using the tick boxes provided

- With your members selected, tap on the appliance that you would like to assign them to
- You will see that the members you have selected will now appear underneath the appliance you assigned them to

13. Creating Teams
Teams can be created ‘on the fly’ for a range of purposes. Both broadcasts and individual members can be added to a team, with the ability to filter members on their qualifications.
- Open up the BART Team App on your device
- Either swipe right or tap on the hamburger icon to reveal the main menu

- Tap on the ‘Teams’ menu item
- Create a new team by tapping on the plus + button in the top right-hand corner of the screen

- Enter in a name for your team in the field provided
- Tap on ‘Create’
- To add members or incidents to the team, tap on the team you just created
- Tap on the plus + icon in the top right-hand corner of the screen

- Select either ‘Incidents’ or ‘Members’ from the list provided
- If you choose ‘Incidents’, you will see a list of all incidents available to you. Select one or more from the list.
- If you choose ‘Members’, you will see a list of members available to you. Select one or more from the list.
(members can be searched for using the field provided, or using the filter option)


14. Documents
The BART Document library is there for all members to view, upload and download documents relevant to their group or an incident.
Documents can be in the following formats:
- DOC
- DOCX
- JPG
- JPEG
- GIF
- PNG
Folders can be created for the documents, as this allows for easier categorising and faster searching of specific files.
15. Calendar Events
Creating a New Event
Calendar Events help you to keep track of everything that’s going on within your group. Events can be setup for training sessions, site and machinery maintenance, fundraising events and administrative meetings.
Like a broadcast, members can:
- Accept
- Decline
- Other
If a member accepts a calendar event, their availability roster is adjusted automatically to say ‘Booked’ for the duration of the event.
New calendar events can be created using the BART Team App or the Members Area.
BART Team App
- Navigate to the ‘Events’ item in the quick menu at the bottom of the screen
- Tap the plus + icon in the top right-hand corner of the screen
- You will be prompted to enter in a range of details about your event
- Event name
- Group
- Type
- Status
- Resources
- Start date and time
- End date and time
- Location
- Minimum number of members required
- Maximum amount of members
- RSVP (date)
- Reminder (date)
- Notes
- Once you’ve finished, tap on ‘SAVE’
- You should now see your new event within the calendar displayed
Members Area
- Log into the BART Members Area
- Navigate to the ‘Events’ item in the main menu
- Click on the blue ‘NEW’ button in the top left-hand corner of the screen
- A dialogue popup box will appear
- Fill in the fields relevant to your event
- Click ‘SAVE’
Attending an Event
Members will see events popup in their standard broadcast feed when published. An extract of the event information will be displayed, along with the location – similar to a regular broadcast. To view all the event details, members can tap on the event attachment icon.